This is one of my go-to designer tricks for a layered look! I know it’s not for everyone, but I’m a big fan… whether you’re installing artwork in front of canopy bed panels or you’d like to float artwork in front of your stacked drapery between windows, this quick tutorial is for you! This layered artwork installation instantly adds dimension, softness, and a designer touch to any vignette- but it can be tricky to execute. In this post, I’m walking you through exactly how I do it. I’m sharing my tools, measurements, and the simple steps I rely on to securely hang art in front of drapery, while keeping everything looking clean, elevated, and intentional. Click through for my DIY on how to hang artwork in front of curtains!
Whether you’re finishing a bedroom or styling a living room, this is a method you can reuse again and again. It’s also one of my favorite designer hacks to layer visual interest without giving up functionality or texture. If you’re on the hunt for drapery that looks elevated but doesn’t stretch your budget, I recently shared a roundup of The Best Budget Curtains That Look Custom. It pairs perfectly with this tutorial if you’re pulling a space together from scratch. Let’s get started!
Why I Love This Look

Hanging art in front of curtains adds a layered and thoughtful aesthetic you don’t see every day. It’s definitely a styling decision that makes a room look more considered and elevated. I’ve used this approach in bedrooms, dining rooms, and living rooms when wall space was limited or the vignette needed a little something extra. It’s a great way to bring art into a space without sacrificing beautiful window treatments.
What You Will Need

Here’s what we used for our installation:
- Artwork (sized to work well with your wall space or curtain panels)
- Scrap wood (cut to match the height of the artwork)
- Small wood blocks (to build out the projection)
- Picture Hanger (I used a sawtooth hanger)
- Laser Level (or regular level)
- Tape Measure and Pencil
- Power Drill
- Drywall Anchors & Screws
- Sticky Tack (for stabilizing)
I used leftover materials from other projects, so don’t overthink sourcing these. A few scrap pieces of wood and a simple hanger will do the job just fine!

Step-by-Step: Hanging Art in Front of Curtains
Step 1: Mark Your Center Line
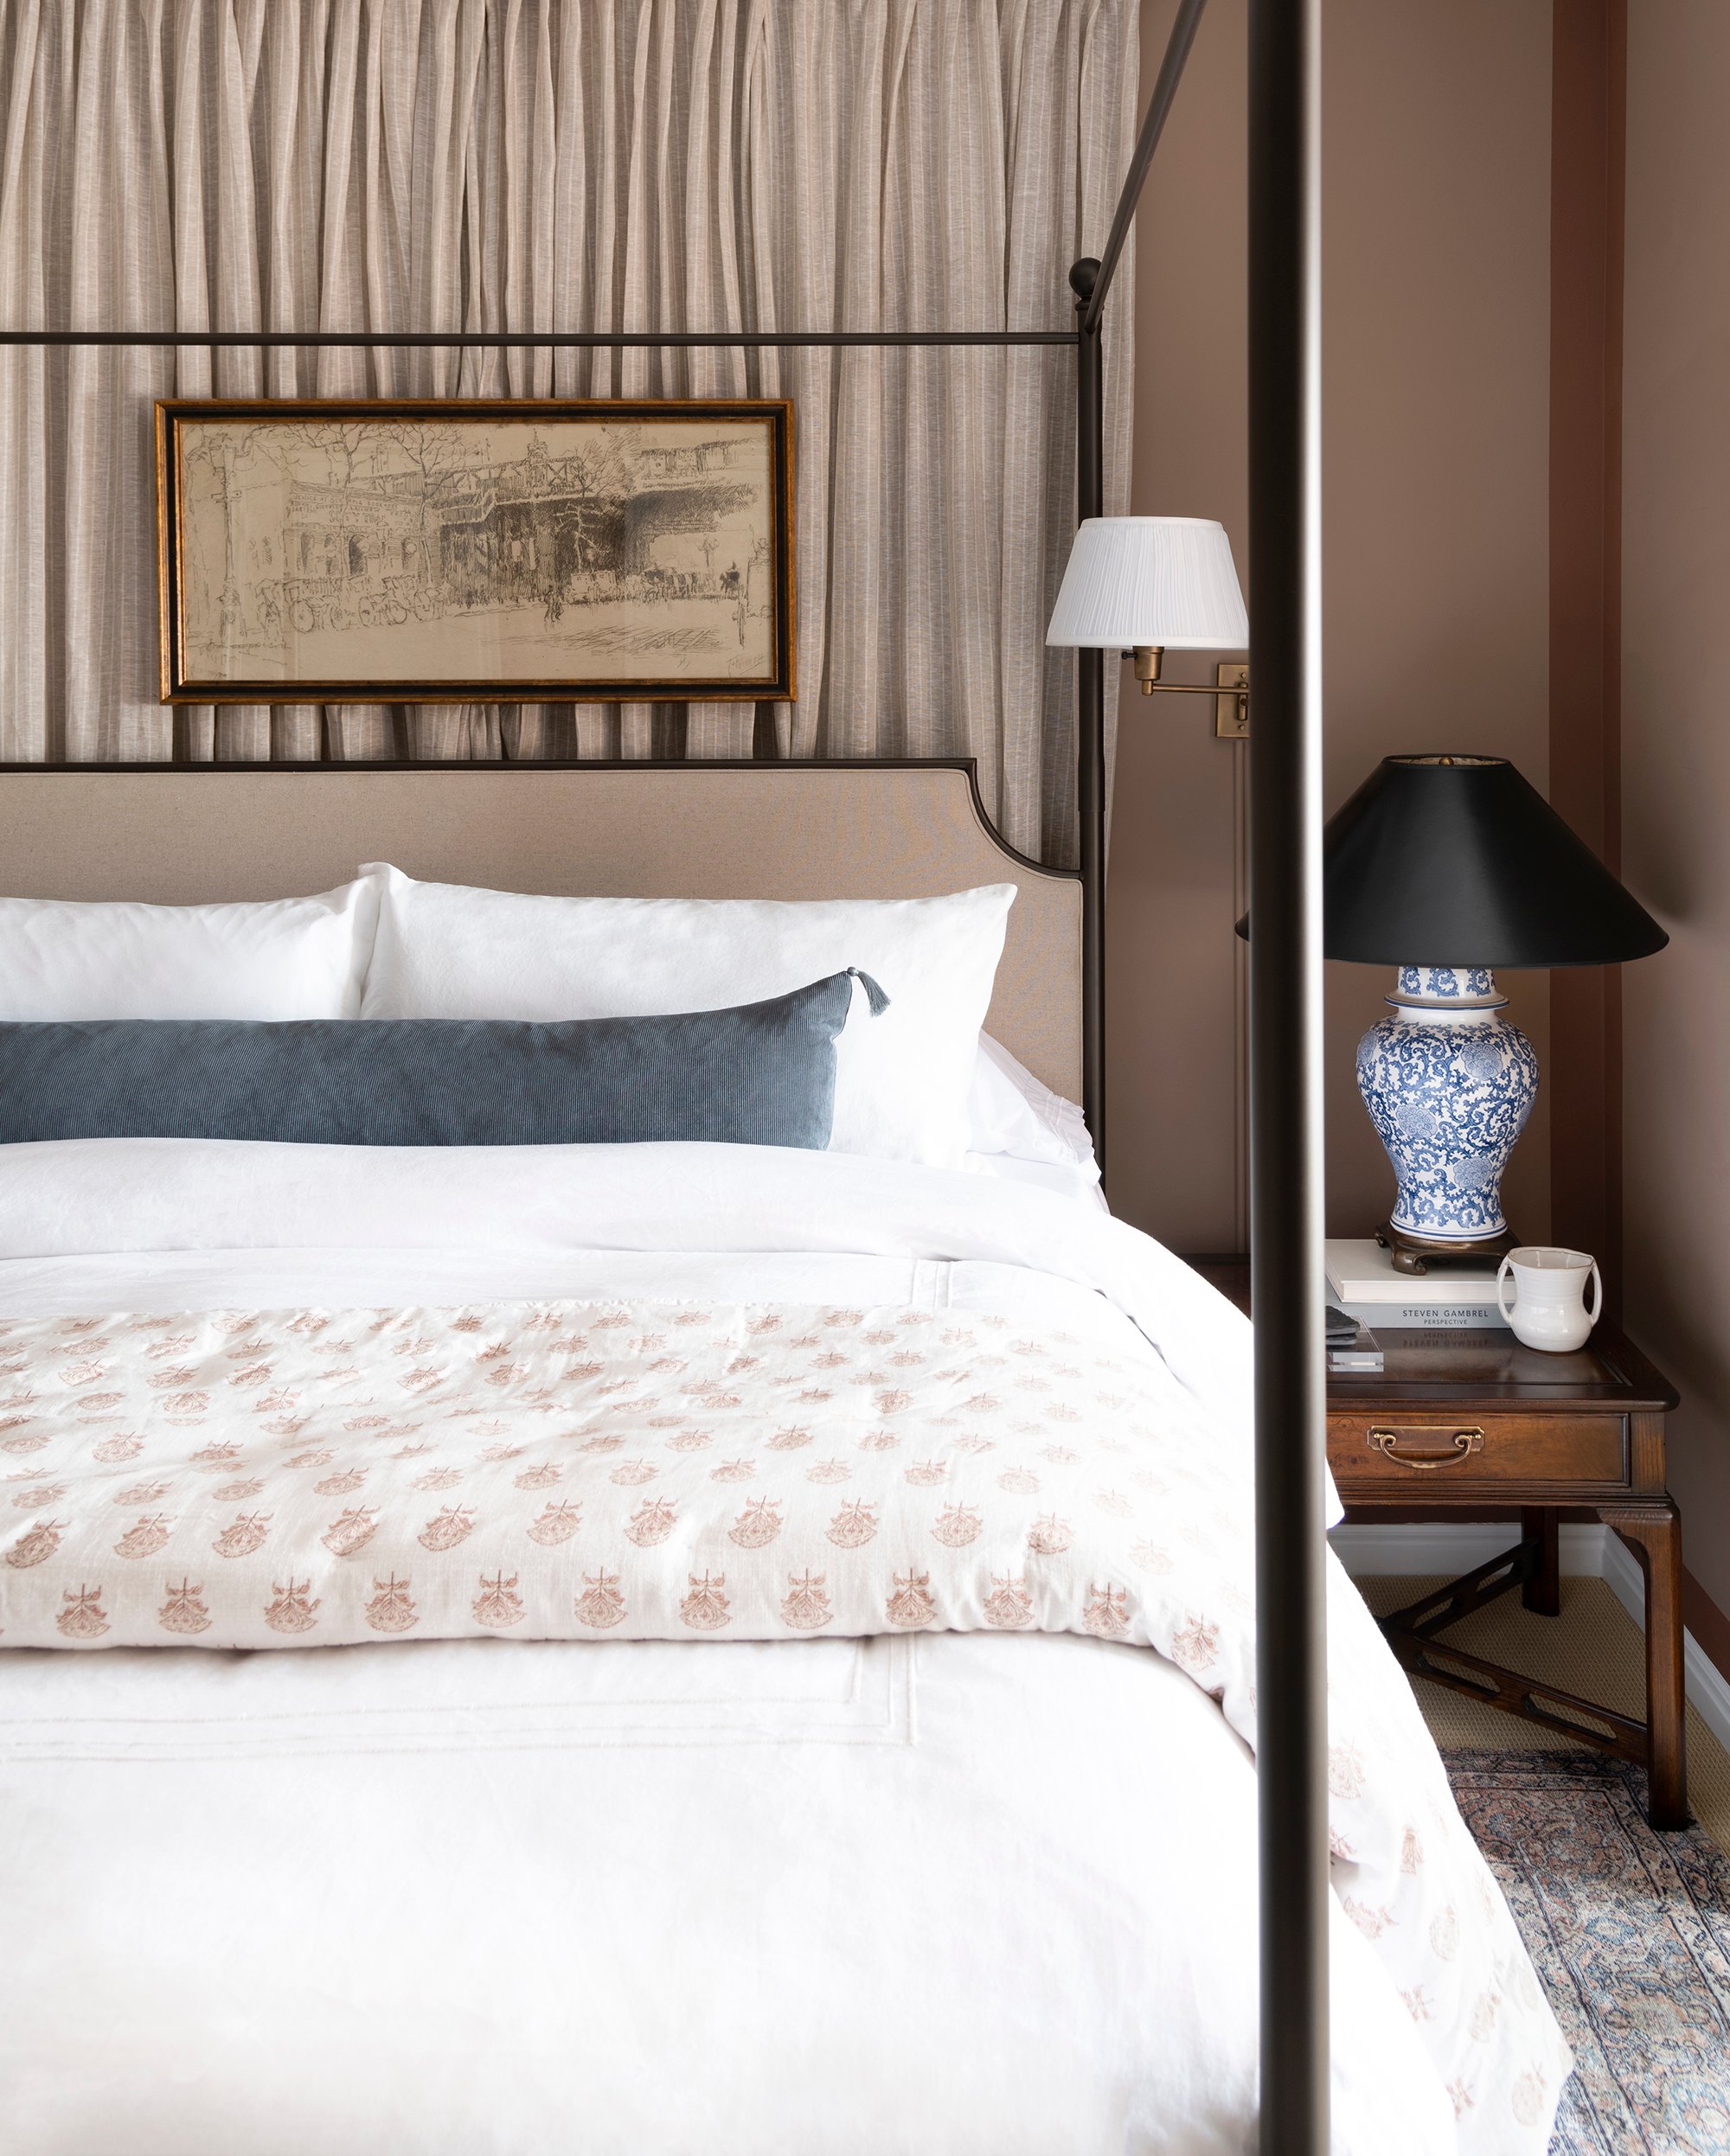
We began by measuring the center of the wall and used a laser level to mark exactly where we wanted the artwork to hang.

I always make sure the piece is centered between the drapery panels and placed at a height that doesn’t interfere with the rod or finials. In this case, I used our canopy bed to frame the artwork.

Step 2: Prep Your Artwork
If your art doesn’t already have one, screw a sawtooth hanger directly into the back. I prefer this to wire hangers because it keeps the artwork tight to the wall and doesn’t allow it to tilt or sag.

We located a scrap piece of wood and cut it to the exact vertical size of our art, spanning from top to bottom.

Step 3: Create Spacer Blocks
This part is key. To float the artwork out in front of the drapery panels, we made two “block sandwiches” from scrap wood to match the depth we needed. Built this out as far as you’d like for the projection.

Here’s a closer look at our little wood block sandwich… we needed two of these (one for the top and one for the bottom) that perfectly match, in regard to depth.

These give the illusion that the artwork is floating and create space between the curtains and the art.


Then, we double checked our measurements, moving the strip onto the wall, making sure everything was aligned and properly measured.

Step 4: Mount the Blocks
We used drywall anchors to securely attach the blocks to the wall. One goes behind the top of the artwork and one behind the bottom.

Next, you’ll set the drywall anchors. These are especially important for installing heavy, oversized, or custom framed pieces of art. They add stability and ensure the artwork doesn’t rip from the wall… especially for pieces that project or appear to float, as they pull away from the wall.

Screw the first block into the wall, and repeat the process with the second block. Remember- they don’t have to look pretty, as they’ll be totally hidden.

Step 5: Attach the Vertical Support
Next, we screwed the narrow wood strip into the blocks. This vertical strip supports the artwork and keeps it in place without letting it lean or swing.

Step 6: Hang and Stabilize the Art
Add a nail to the strip, then you’re ready to hang your art! Keep in mind, it will be a bit wobbly, but we’ll address that in the next step.

My easy secret weapon for hanging and securing artwork is sticky tack. On the backside of the artwork (between the art and the wood strip), I rolled up generous balls of sticky tack, pressing to secure the art at the bottom. Once secured, check the art to ensure it is no longer wobbling or can be tilted.

Step 7: Style Your Drapes
After the art is up, I like to train the curtains around the piece using my steamer or a few pins. If your drapery is mostly decorative and does not need to move, it’s worth styling once… then allow it to sit that way. Check out this post on how to train readymade curtains– it’s a must-read for this tutorial.

Why I Always Come Back to This Method
I use this trick all the time because it solves a problem I run into often. When the perfect wall for art is already covered in fabric, it might seem off-limit… but art actually enhances the vignette by adding depth. You can absolutely layer art right over your curtains with just a few simple tools and a bit of planning. It adds so much charm without making the space look too busy, and once it’s up and styled- I always adore the end result.

FAQ
They are still functional, but it’s more of a pain to keep them looking nice and styled. I primarily use this trick when the curtains are purely decorative (like behind my bed). It’s great for layered window treatments… when you’re using the roman shades for function, and the drapery panels for aesthetics.
Definitely. I’ve done this with pinch pleats, linen panels, and even heavy blackout curtains. As long as the panels hang straight and aren’t too bulky, you can layer art in front.
Absolutely! You can find my bed here… it’s actually on sale right now. Check out our maroon guest bedroom tour if you missed it. It’s one of my favorite spaces we’ve tackled on a budget.

Related Posts
If you’re planning a room refresh or are working on styling for the season ahead, here are a few more posts that walk through similar design details:
- Timeless Tips for a Bedroom Refresh Without a Renovation
- Best Affordable Bedding for a Designer-Looking Bed
- Traditional Neutral Gallery Wall Picks
- How to “Train” Readymade Curtains
- 20 Things Every Bedroom Should Have (According to A Designer)
- How to Install Casual Linen Drapery Panels
- How to Choose the Best Picture Light for Your Artwork
- Maroon Guest Bedroom Reveal
- Designer Picks: The Best Bed Frames from Wayfair

If you’ve ever been stumped on how to hang art in front of curtains, I hope this post gives you the confidence to try it! It’s such a simple upgrade that can really pull a room together. Let me know if you try it… I’d love to see your results. Here’s to a beautiful long weekend ahead. We’re enjoying time away in Jackson Hole to close out the summer season.
The post How to Hang Artwork in Front of Curtains appeared first on Room For Tuesday.