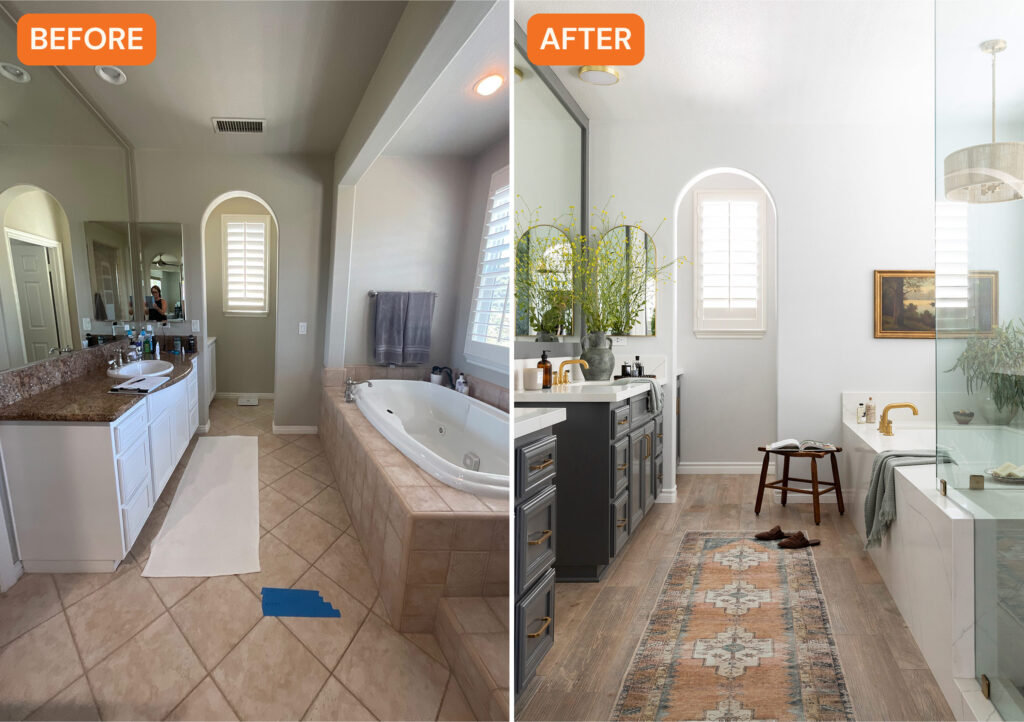
If you’re like most people, you don’t exactly have a huge or unlimited budget for a home renovation. But that doesn’t mean you have to skip the remodel entirely; there are plenty of ways to completely transform a space without an expensive overhaul—it just takes some smart and calculated design choices. This bathroom in a four-bedroom, three-and-a-half bathroom home in Aliso Viejo, California, is proof it’s possible.
The homeowners already made DIY updates to other parts of their home, which was built in the 2000s, but left their primary suite for last because they weren’t sure what to do with it. They brought in Julie K. Beuerlein of JKB Home Design to oversee the makeover.
Ryan Garvin
“They wanted an updated primary bathroom that felt sophisticated yet comfortable,” Julie explains. “They did not have a budget that allowed for a lot of construction so we needed to really maximize the layout as it was and utilize anything that wasn’t terrible.”
The bathroom was bland, boring, and beige, but it did have a good layout, which was a big win since not a lot of construction or demo-ing was needed, just cosmetic changes or a “lipstick remodel,” as Julie calls it.

Ryan Garvin
“It had separate vanities, a walk-in shower, a whirlpool tub, and a separate water closet. So I knew we didn’t have to rearrange everything and could instead focus on a significant aesthetic overhaul to address the very dated materials and fixtures, the vanilla color palette, and the tub that looked like it was from The Love Boat era!” Julie says.
Since the bathroom already had a layout that made sense, Julie and team painted the existing vanities, added wood frames to the mirrors, and replaced the countertops with a quartz that featured subtle gray veining. The fixtures were swapped for brass ones from Studio McGee x Kohler’s line. Brass hardware was installed on the cabinet drawers and doors.

Ryan Garvin
“Brass provided a moody, rich contrast against the dark charcoal paint and tile, looking beautiful against the white quartz,” Julie says. “I’m seeing a lot of black fixtures lately. I tend to avoid finishes that will feel dated in a few years.”
Since the primary bathroom is connected to the primary bedroom suite with no door, Julie and team installed flooring—wood-look porcelain tile from Bedrosians—that works well in both areas and runs through the entire space for a cohesive look.

Ryan Garvin
The biggest project was figuring out what to do with the tub and shower area. Originally there was a dated drop-in tub and the shower was cramped and doorless.
“There were also two large windows on that wall, and nothing was centered on the windows,” Julie explains. “So we installed a new bathtub, centered it on the picture window, and used the same quartz from the countertop as the surround, extending it into the new shower to create a bench. We designed the surround with a generous ledge, wide enough for a glass of wine while in the tub or even to sit on if you’re getting dressed.”
The glossy black wall and ceiling tiles in the bathroom were chosen as a contrast to the white quartz. Julie added the woven light fixture above the tub to bring in softness and texture.

Ryan Garvin
The finished look is elevated with a little bit of drama. “The thing that surprised them the most was how a few key decisions, such as adding decorative lighting, painting the existing vanities, and using the overall layout of the bathroom, made a huge difference,” Julie says of the homeowners. “They didn’t have to move out or tear down one wall—but now they have a brand new, beautiful primary bathroom to enjoy for many years to come.”
If you want to do your own “lipstick remodel,” Julie has a few tips. First, you’ll want to consider a few key elements—the overall layout and the condition of the vanity, plumbing fixtures, and light fixtures. If the layout is poor, Julie says this type of renovation will be difficult. But if the layout works, then you can go ahead with it.
“Sometimes a coat or two of paint can really transform the space, and adding hardware really elevates that overall appearance,” Julie suggests. “Plumbing and lighting fixtures are relatively easy to replace. If the budget allows, changing countertop materials or flooring can also make a huge impact.”

Ryan Garvin
And creating a layered look is important in any remodel, especially a “lipstick” one. Julie says this can be achieved in two ways, the first is being careful about the selection of colors, finishes, lighting, and accessories. Make sure that these selections connect to the home’s architecture and environment, or else “it will be like wearing a tuxedo to a yoga class; it will stick out and feel very awkward.”
“Hiding your footprints” is the second way to achieve a layered look. “By that I mean you don’t want the elements to look like they’re from the same store, or same exact design style, or same exact color,” Julie explains. “Mixing it up, using different tones of a similar color and various types of materials are the key details that give any space that timeless ‘always been here’ feeling. Also, people probably know this but it’s important to say: stay clear of what’s currently trendy and focus on materials and colors that are classic.”
We only recommend things we love. If you buy something through our site, we might earn a commission.