If you’re considering new carpet for your home or just starting to explore your options, this post walks you through everything you need to know. I’m sharing the entire process from selection to installation- including tips for choosing materials, getting the best estimate, and what to expect on install day. We replaced our upstairs carpet over two years ago, so I also wanted to share how it has held up! Click through for all the details and my designer tips…
As a designer, this was surprisingly my first time having carpet professionally installed in one of our own homes, so I approached it with a fresh perspective and plenty of research. I’ll break down what worked, what to avoid, and how to make sure your new carpet looks perfect in your space. One of the small but important things I looked into was how to remove furniture indentations from carpet, especially after moving everything back into place. If you’re also navigating a new install or refreshing an old one, that quick guide might be helpful to keep bookmarked. Let’s dive in!
Why I Wanted to Replace Our Carpet
The existing carpet upstairs was left by the previous homeowners, and it always felt like an afterthought. It was a basic gray color that didn’t suit our style and wasn’t holding up well to our dogs… you can see the before tour of our new house for a closer look. It was even installed in the basement bathroom, which I immediately knew had to go! I had put it off for years, mostly because of the hassle of moving furniture and budgeting for something that wasn’t at the top of my priority list, but once I started painting upstairs, I figured… why not finally tackle it?

Why I Chose Carpet (Yes, Really)
Most of the time, you’ll see me installing hardwood flooring or tile. But I actually like carpet for specific spaces. Here’s why I chose it for the bedrooms:
- It adds softness underfoot- especially in bedrooms
- It was more budget-friendly than other options
- It was quick to install (and we didn’t have to do it ourselves)
- It adds warmth and helps insulate upstairs
- It makes the rooms quieter and improves acoustics
- I like mixing materials for variety throughout the house- it adds an extra layer

How I Picked the Carpet and Pad
I didn’t spend long at the store, maybe twenty minutes tops, grabbing a few swatches and carpet boards to bring home. It was a spur-of-the-moment stop, but I already had a decent idea of what I wanted. I was mostly looking for something durable, classic, natural, and easy to live with. Here’s what I had in mind going in:
- Durability was a must. This carpet needed to hold up to daily life.
- It had to be spill and stain resistant– something I didn’t need to stress over with guests or pets.
- I’m always drawn to natural materials, ideally something with a wool blend.
- I wanted a timeless look that felt traditional, like a subtle berber, wool, or sisal style.
- Low pile was another priority to keep things looking clean and structured.
- It needed to be easy to maintain, with simple cleaning and upkeep.
- And of course, it had to be pet friendly, since our dogs are a big part of daily life around here.

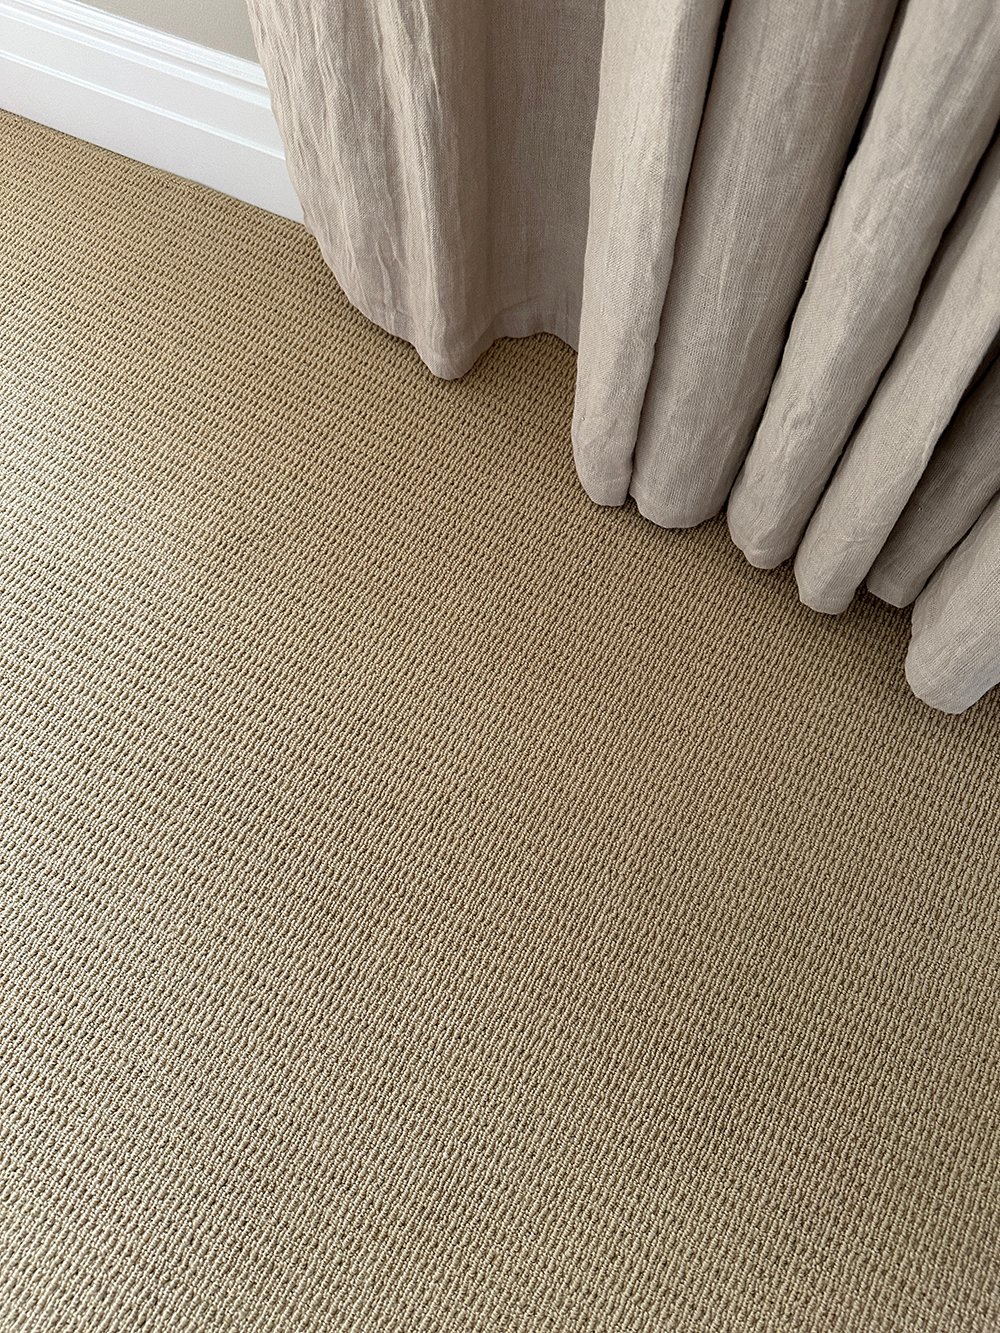
After chatting about our options with Emmett and estimating what best fit our budget and goals, we landed on a carpet by Natural Harmony (style: Terrain / color: Straw). It’s just over $6 a square foot, looks very similar to densely woven sisal, but with the softness of wool. It’s made of 100% Wooltex- which equates to 51% wool and 49% olefin.
Wool is a natural material, so it’s antimicrobial, helps wick away moisture, and is an eco-friendly option. Olefin, on the other hand, brings durability to the mix. It resists spills, mildew, and fading, and is super easy to clean. That blend gave us the performance we needed without sacrificing comfort or style.
Our carpet came with a limited lifetime stain warranty and a 25-year wear and tear warranty, which gave me some peace of mind knowing it’s made to last. It’s supposed to resist fading and hold up well over time. For upkeep, I vacuum it regularly just like any other carpet. If something spills, I blot it right away since the liquid sits on the surface instead of soaking in. I also plan to schedule a professional steam cleaning every year or two to keep it looking its best.

There weren’t a ton of carpet pads to pick from, so I went with a solid middle-of-the-road choice. I landed on a dense SpillSafe foam that blocks liquid and odor while still giving a nice, supportive feel underfoot. It wasn’t the cheapest or the most expensive, which worked well for our budget and still gave us the quality I was hoping for.

Color and Lighting Lessons
When it came to color, there were so many beautiful options in this style. For our upper floor, Hazelnut and Straw were the top contenders. I ran a quick poll on Instagram and over 80% of you picked Hazelnut, the cooler-toned swatch (pictured below)… but I went with Straw instead. Why? With the natural light in our house, I knew it would read cooler once installed, and Hazelnut might end up looking too gray… less like the sisal vibe I wanted.
It’s a good reminder that color is always going to behave differently from one home to the next. What looks warm and cozy in one space might read flat in another. If you’re shopping for carpet, definitely take those swatches home and move them around your space before making a decision.

The Estimate and Scheduling Process
After picking out the carpet and pad, the next step was scheduling the estimate. The day after my store visit, someone came by to take measurements of the upstairs bedrooms (four in total), which took about an hour. Before they showed up, I made sure I had a few things ready to go so everything would run smoothly.
I had already decided which rooms were getting carpet (including the closets), noted the carpet and pad details with SKU numbers, and figured out what kind of transitions I wanted between spaces. I also did a quick estimate of our square footage so I’d have a good idea of what to expect price-wise when the formal quote came in.
Once measuring was finished, the formal estimate arrived to my email the following day. I looked everything over, approved the estimate, paid for our materials, then all that was left was to schedule the installation.

Installation Day
Just a heads up, you’ll want to be home during carpet installation. Emmett and I both cleared our schedules that day so we could help move furniture, answer questions, and stay looped in as everything was installed. The night before, we fully emptied the upstairs… furniture, rugs, anything on the floors- even inside the closets. We also had to take the bifold doors off in three of the bedrooms, which took more time than I expected.

You can definitely pay extra to have the installers handle larger pieces, but to save money and avoid any mishaps with our things, we just powered through it ourselves. At one point, Emmett joked that it was like moving out of a house all over again, which honestly wasn’t far off.
Carpet removal was part of the package, so the installers started by pulling up all of the old carpet and padding. They took it all the way down to the subfloor, clearing the way for a clean, fresh install.
During installation, we made sure to keep the house nice and warm, above 75 degrees, since temperature plays a big role in helping the carpet settle or acclimate properly. I stayed close by to keep an eye on the progress and to chat through any questions. Our installers were wonderful to work with and really communicative throughout the day. They asked for my input on things like seam placement and made sure everything met my expectations. I appreciated how careful and thoughtful they were with the entire process.

Emmett jumped in to help with the thresholds while the crew worked. Instead of using raised pieces, he installed flat, horizontal hardwood transitions that matched our flooring. It was a small detail that made everything look really clean, tailored, and intentional.

Seams were definitely the part I was most nervous about. With wool, berber, and sisal-style carpets, it’s really easy for seams to stand out in all the wrong ways. I’ve seen it happen before, and I knew it could make or break the finished look. Thankfully, our installers were pros. They walked me through their plan, talked through where each seam would go, and made sure everything lined up as cleanly as possible. I was so relieved when I saw the final result, it honestly looks seamless!

After the Install
Once the carpet was installed, I asked the team if there were any remnants we could use elsewhere. If you end up with extra material, you can always have it bound into rugs or runners for other parts of your home. We only had one small piece left, but it should work perfectly as a little doormat by the garage entry.

That same day, we were able to move all of our furniture back in. I took it as a chance to really reset the upstairs- deep cleaning each room, conditioning the leather, oiling the wood furniture, organizing drawers, and I even did a bit of styling. The whole level looked and felt brand new. I also made a note in my calendar to get everything professionally steamed in a year or two to help keep the carpet in great shape for the long haul.

From the day I picked out samples to the final install, the whole carpet process took less than two weeks. I was genuinely impressed by how quickly everything came together. Even though it wasn’t something I had planned far in advance, I’m so glad we went for it.
Click directly on each carpet swatch below to be redirected.

If you’re thinking about replacing your carpet too, I’ve linked some of my favorite options from Home Depot below. These are the styles that stood out to me (in person) for their durability, texture, and timeless look, just in case you’re browsing and need a good starting point.

Expert Tips
- Always test swatches at home before committing
- Keep your home above 75 degrees during and 48 hours after install
- Don’t skip the carpet pad research- it makes a huge difference underfoot
- Ask for leftover pieces to turn into custom rugs
- Watch the seam placement… especially with wool, berber, or sisal styles
Maintenance Tips
- Vacuum weekly
- Blot spills right away (don’t rub)
- Steam clean every 12 to 18 months
- Keep the temp steady the first few days after install

FAQ
Almost three years later, our carpet still looks and feels new. We’ve definitely put it to the test… accidental spills (wine and even coffee), dog accidents, and mud- but it has cleaned easily and still looks great a few years later. We are cautious to keep it clean, take good care of it, and don’t wear shoes in our home, but it’s a choice a would definitely make again!
Seams were one of my biggest concerns, especially with the type of carpet we chose. I made sure to ask the installers about placement ahead of time. They were great about hiding them and walking me through their plan before cutting anything. If you’re going with a textured or patterned carpet, I’d definitely recommend bringing this up early in the process, so you can plan ahead.
Definitely. The pad makes a bigger difference than you’d think. I chose a SpillSafe foam option that prevents odor and liquid absorption, and it gives a nice dense feel underfoot. It wasn’t the cheapest option, but it did add comfort and longevity to the carpet… which felt worth it to me.
I wish I had known how quick the whole process can be. From choosing the material to install day, it was just under two weeks. I had this idea in my head that it would be a huge ordeal, but it moved fast. If I had known, I probably would’ve done it sooner.
Here’s a closer look… pictured below. I like the clean aesthetic of a piece of flooring running in the perpendicular direction for a simple and easy threshold. Everything is flush and it’s not a tripping hazard, like other raised thresholds.

Related Posts You Might Like
If you’re updating your flooring or refreshing your house, you might also enjoy these related posts:
- How Designers Choose & Use Wall-to-Wall Carpet: 10 Tips
- How to Remove Furniture Indentations from Carpet
- Timeless Tips for a Bedroom Refresh Without Renovating
- Stair Rods: The Finishing Touch for Your Stair Runner
- Why We Don’t Wear Shoes in the House
- How to Clean and Care for Natural Fiber Rugs (Without Ruining Them)

I’m so glad we tackled the carpet upstairs a few years ago. It completely changed the look and comfort of our bedrooms and gave me a much-needed push to start wrapping up a few other spaces around the house. If you’re thinking about updating your own carpet, or just starting to plan- I’m happy to answer any questions you have along the way. Just drop me a comment below!
The post Replacing Our Upstairs Carpet appeared first on Room For Tuesday.